
Before you add images to your blog or website, first you must ensure the images are sized appropriately. Large image files cause usability issues such as longer browser loading times.
If you reduce the size of images on your blog or website, your site will rank higher in search engine results. Large files slow down your site’s load time and search engines are known to punish slow sites.
The most common WordPress featured image size is 1200 x 628 pixels. These dimensions satisfy most WordPress blog themes. Images should be kept between 60 and 100 kilobytes. Smaller images should be closer to 30 kilobytes or lower.
The Microsoft Paint graphics editor comes standard with all versions of Microsoft Windows. The instructions below refer specifically to Microsoft Paint since this is one of the most popular image editors used by digital content producers.
Steps to resize an image
Follow the steps below to optimize an image for your blog or website.
Open Microsoft Paint on your PC (personal computer). To do this, go to Start > All Programs > Accessories > Paint. Or you can use this shortcut: Click the Start icon and type in the word “Paint.” The Search bar will appear as soon as you type the “P” in Paint. See the screen capture below.

In Paint, go to File > Open. Find your image and select it.
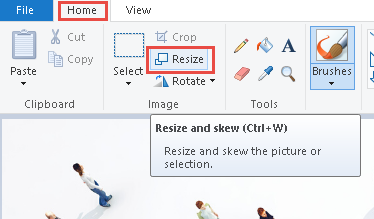
Select the Home tab in Paint to show the toolbar.
Once you see the toolbar, select the Resize button. See the screen capture below.
Select Pixels and enter the appropriate size. Ensure the Maintain aspect ratio box is checked so the image will remain in proportion. See the screen capture below.
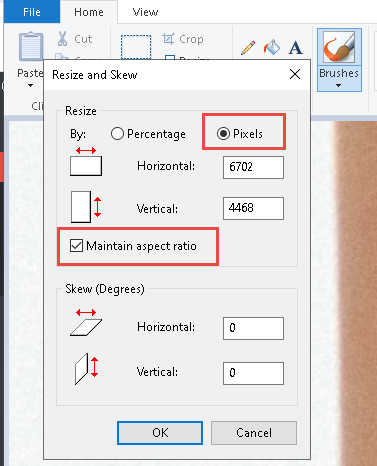
- Enter the correct value and select OK. The image will resize.
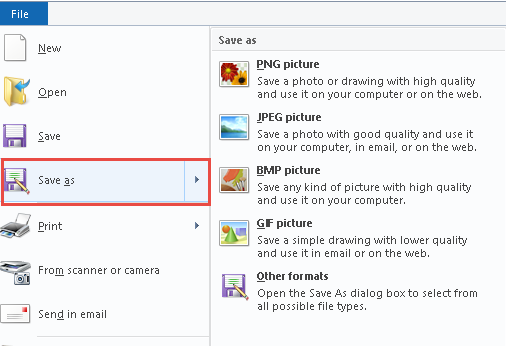
- Select Save or Save As. Select Save As if you want to change the file type. See the screen capture below.
The image is now ready to post.
The size and quality of the image you plan to use on your blog or website is determined by several attributes. Learn more about these image attributes below.
Physical size
The physical size of an image is based upon the size of the image on the screen and the file size. Generally, the file size is treated as a different issue. An image’s physical size determines how much “space” the image occupies. If your WordPress Theme features a fixed-width content area of 600 pixels and the image you want to use is 800 pixels, the image may contort your design.
File size
An image’s file size dictates the time it takes to load your page. The larger the file size, the longer it will take to load. Website visitors often don’t have the patience to wait through long page load times so it’s important to keep your file sizes low. This speeds up your website or blog access times.
Resolution
Resolution refers to the number of pixels in an image. Resolution is sometimes identified by the width and height of the image as well as the total number of pixels in the image.
File type
Websites use 3 common file types. The end of a filename (called the extension) indicates what type of file it is.
- jpg (JPEG) is good for photographs. When you save a photo as a jpg, it removes detail from the photo. Many photo editors allow you to control how much detail is removed.
- gif is better for line art, like logos, with solid areas of the same color. This file type is not recommended for photos. The gif format only uses 256 colors.
- png is for both photographs and line art. It compresses photos without losing detail but usually makes larger photo file sizes than JPEGs. Note that some older browsers don’t completely support png file types.
Most digital content creators use JPEG or JPG for images with lots of color and PNG for simple images.
Even after you’ve resized your image and uploaded it to your blog or website, be sure to evaluate the image critically. Ensure you have selected the right image, one that is both professional and engaging. Don’t use any stock image you can locate.
Always use images that best represent your brand, industry, product or service. This takes extra time and effort but you’ll be happy you made the investment.
 Thanks for visiting the Aristeen website. If you are interested in any of our digital marketing or content development services, please contact me directly at